
To master home studio recording techniques today, start with the right equipment. You’ll need a reliable computer, audio interface, and a good dynamic microphone for clear recordings. Treat your room acoustically by minimizing reflections using panels or blankets and managing background noise. Experiment with microphone placement to capture the best sound and guarantee your mixes are balanced using EQ and compression. Focus on refining your mixes through regular testing and feedback. You’ve got the basics covered, but there’s so much more to explore for achieving professional results—so keep going to reveal additional insights and tips!
Key Takeaways
- Set up a quality microphone and audio interface to capture clear recordings, ensuring proper signal flow for optimal sound quality.
- Treat your recording space acoustically by using panels and rugs to minimize reflections and background noise interference.
- Maintain a microphone distance of 6 to 12 inches, adjusting angles to reduce sibilance and enhance tonal clarity during recordings.
- Master mixing basics, focusing on equalization, compression, and reverb to create a balanced and cohesive sound across your tracks.
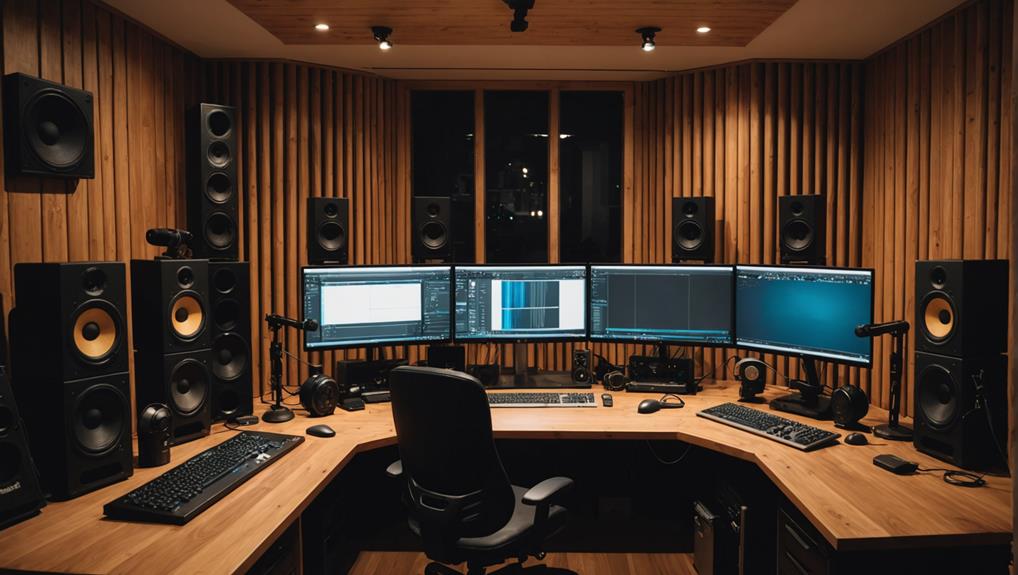
Essential Home Studio Equipment
Setting up your home studio starts with essential equipment that guarantees you can record and produce high-quality music effectively.
First, your personal computer is the backbone of your setup, running Digital Audio Workstation (DAW) software for recording and editing. You’ll need an audio interface to connect microphones and instruments, ensuring you capture professional sound. Investing in a good dynamic microphone is imperative for getting clear vocals and instrument recordings, keeping your budget in mind.
Next, high-quality studio monitors or headphones are essential for accurate sound monitoring. They help you create mixes that translate well across different playback systems, enhancing your mixing and mastering process.
Don’t overlook additional equipment like microphone stands, pop filters, and cables—these are crucial home studio equipment that contributes to a functional recording environment.
Acoustic Treatment Techniques
Effective acoustic treatment techniques can greatly improve your home studio’s recording quality by reducing unwanted sound reflections and enhancing clarity.
To capture clean recordings, focus on minimizing reflections that can lead to tinny sounds. Using acoustic panels, blankets, or pillows for sound absorption is a great start. You’ll want to strategically place these panels; experiment with their locations to find the best setup for recording vocals.
Additionally, background noise management is essential. Identify and power down potential noise sources, such as HVAC systems and appliances, to create a quieter recording space.
Incorporating bass traps in the corners of your studio can help control low-frequency sound waves, while rugs or curtains can absorb sound reflections, leading to a more balanced acoustic environment.
Regularly testing your mixes on different playback systems, like headphones and studio monitors, will give you a clearer understanding of how your acoustic treatment impacts overall sound quality.
Microphone Setup and Placement
Getting your microphone setup right is essential for capturing high-quality recordings that truly showcase your vocals. Start by ensuring proper microphone placement; ideally, keep the mic 6 to 12 inches away from your mouth. This distance helps you achieve clarity without introducing excessive proximity effect, which can muddle sound quality.
Don’t hesitate to experiment with angles and distances. Slightly angling the mic can minimize sibilance while enhancing tonal characteristics. Additionally, using a pop filter will help reduce plosives during your vocal recordings, keeping your audio clean and professional.
Remember that the entire microphone chain, from the mic itself to cables, preamp, and audio interface, plays a critical role in achieving ideal sound quality—this setup accounts for about 50% of your vocal take’s quality.
Mixing and Mastering Basics
Mixing and mastering are essential steps in the audio production process that transform your raw recordings into polished tracks ready for distribution. Mixing involves balancing levels, panning, and applying effects to create a cohesive sound. Key techniques include equalization (EQ) for frequency ranges, compression for dynamic control, and reverb for depth. Mastering takes your mixed audio and enhances it for various formats, focusing on volume leveling and final EQ adjustments to achieve tonal balance.
To aid your understanding, here’s a quick overview of the differences between mixing and mastering:
| Mixing | Mastering |
|---|---|
| Balancing levels | Final volume leveling |
| Applying effects | Enhancing tonal balance |
| Focus on individual tracks | Focus on overall track |
| Requires multiple playback tests | Prepares for distribution |
| Creates a cohesive sound | guarantees consistency across formats |
Noise Reduction Strategies
To achieve the best recording quality, it’s crucial to implement noise reduction strategies that minimize unwanted sound interference in your environment.
Start by identifying and powering down noise sources like HVAC units and appliances before you record. This simple step can greatly reduce background noise and create a quieter recording environment.
Next, create a noise reduction checklist that covers potential noise issues, such as air conditioners, fridges, and outside traffic sounds. Addressing these factors helps guarantee your recordings sound good.
Additionally, consider acoustically treating your room with acoustic panels or budget-friendly alternatives like blankets and pillows. This treatment reduces sound reflections, enhancing the overall acoustic quality.
Don’t forget to cover windows and even treat the ceiling to further block external noise interference.
Regularly testing your mixes on various playback systems allows you to evaluate how effective your noise reduction strategies are.
Testing and Refining Your Mixes
After you’ve set up an effective noise reduction strategy, it’s time to focus on testing and refining your mixes for best sound quality. Begin by testing your mix on various playback systems, like headphones, studio monitors, and car audio systems. This guarantees your mix translates well across different environments.
Gather feedback from trusted listeners during this process to pinpoint weaknesses or areas needing improvement. Document your observations and adjustments to create a valuable reference for future projects. Regularly calibrate your monitoring levels to guarantee accurate meter readings, helping you maintain peak levels throughout your mixing.
Experiment with different acoustic environments to see how your mix performs in various settings. This can reveal hidden issues and inform necessary adjustments.
Here’s a quick reference table to help you during the testing phase:
| Playback System | Key Focus Areas | Feedback Approach |
|---|---|---|
| Headphones | Stereo imaging, clarity | Ask for specific details |
| Studio Monitors | Balance, frequency response | Group discussion |
| Car Audio Systems | Low-end response, dynamics | Casual listening session |
| Live Performance Setup | Overall presence | Real-time reactions |
| Alternative Environments | Acoustic treatment effects | Record impressions |
